UPDATE 2019/8
Check this web site Dev on Windows with WSL to learn WSL, terminal config, and VS code in a more comprehensive and elegant way :)
In this article, I’ll introduce:
- Cmder: an intergrated shells console.
- WSL: Windows Subsystem for Linux, an embedded Linux kernel to give you Linux shell when you use Windows.
- oh-my-zsh: a powerful and beautiful shell to replace Linux bash.
their sources, installation steps and usage.
After finishing this, you could get:
- say goodbye to cmd or powershell, replace these with Cmder and its convenient hotkeys.
- run Linux shell commands when using Windows OS.
- fast file management and commands operation experience.
For what I not introduce, please check each tool’s doc given in relative part OR ask in Q&A platform like Superuser.
Prerequsition:
- Win 10 OS
- Anaconda package: download Linux version from the official site.
1. Cmder
Cmder concrete introduction and manual in github.
1.1 Install
(1) Download the latest release.
(2) extract and run Cmder.exe.
1.2 Hotkeys
`Ctrl + ``: Global Summon from taskbar
Alt + Enter: Fullscreen
Ctrl + t: New tab dialog
Ctrl + w: Close tab
Win + Alt + p: Preferences
Ctrl + shift + r: new a tab, split it to the right. If not successful, check Preferences -> Keys & Macro
Ctrl + r: History search
2. WSL (Windows Subsystem for Linux)
WSL doc by Microsoft.
2.1 Install
(1) Toggle Developer mode
In Windows, open Settings -> Update & Security -> For Developers.
(2) Toggle Window feature WSL
Open Control Panel -> Programs -> Turn windows features on or off.
Toggle Windows Subsystem for Linux in the pop-up window.
(3) Install Ubuntu
Search Ubuntu in Microsoft Store. Install Ubuntu the latest Ubuntu 18.04 LTS.
2.2 Usage
Reboot and run Ubuntu. Voila, you get your Linux shell in Windows.
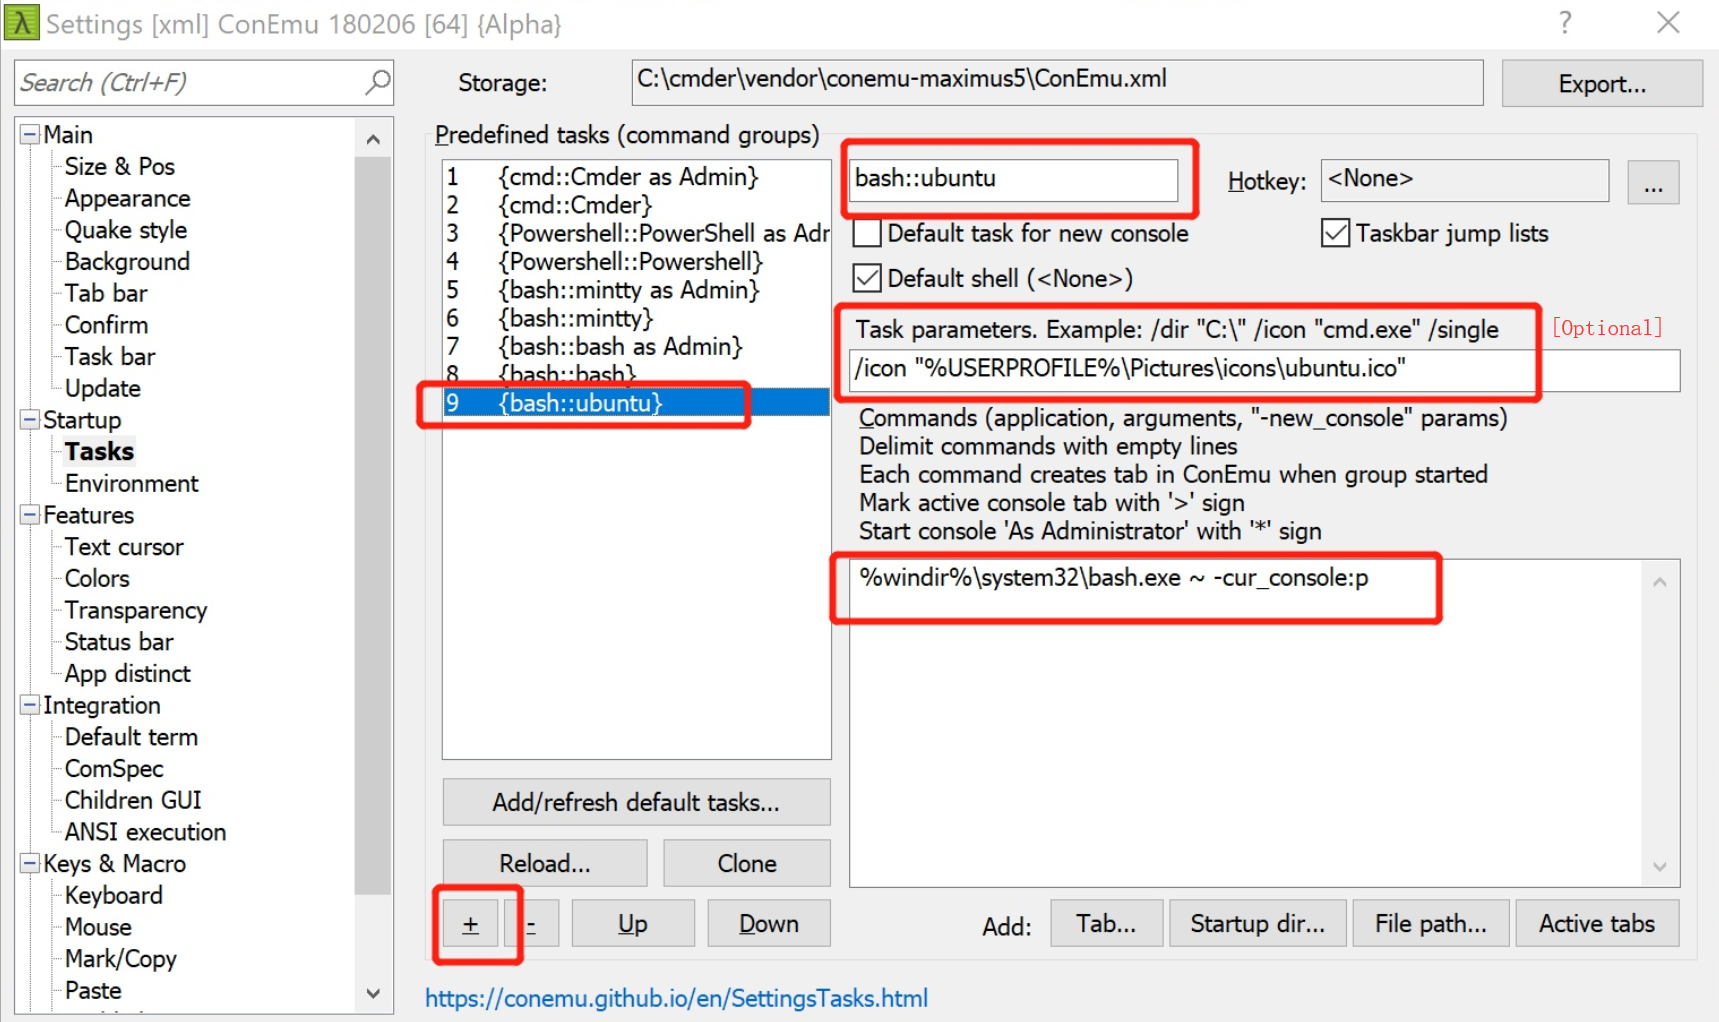
But we want this shell in Cmder. Open Cmder preferences -> Startup -> Tasks. Add a {bash::ubuntu} task like Fig 2.4
%windir%\system32\bash.exe ~ -cur_console:p
Ctrl + T to create a new console, choose {bash::ubuntu} and start.
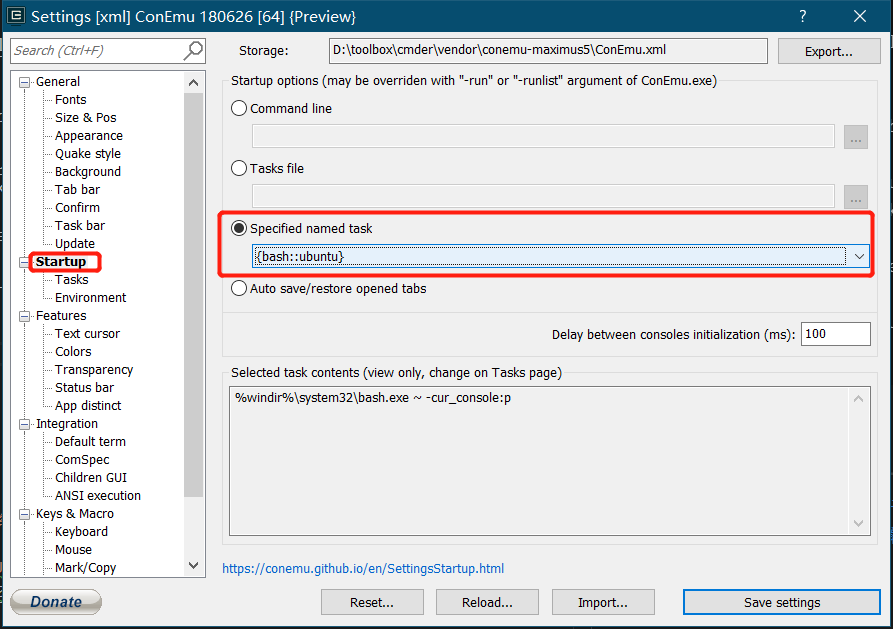
To start Cmder with Ubuntu bash, open Preferences -> Startup, toggle Specified named task and select {bash::ubuntu}.
For Anaconda and node.js installation, see 4. [Optional] Install Anaconda and Node.js.
3. oh-my-zsh
oh-my-zsh in github.
The actual shell we use to replace Ubuntu bash is called zsh, while oh-my-zsh is the framework to easily manage zsh config. So, install zsh first.
3.1 Install
(1) Install zsh
In WSL Ubuntu bash in Cmder:
sudo apt-get install zsh

zsh --version
the second line to check whether successfully install zsh.
(2) Install oh-my-zsh
sh -c "$(curl -fsSL https://raw.githubusercontent.com/robbyrussell/oh-my-zsh/master/tools/install.sh)"
3.2 Usage
You can input “zsh” to switch bash to zsh, but we want {bash::ubuntu} task start with zsh, so add:
exec zsh
in the end of ~/.bashrc.
The power of zsh shows in its customization and plugins.
(1) Customization
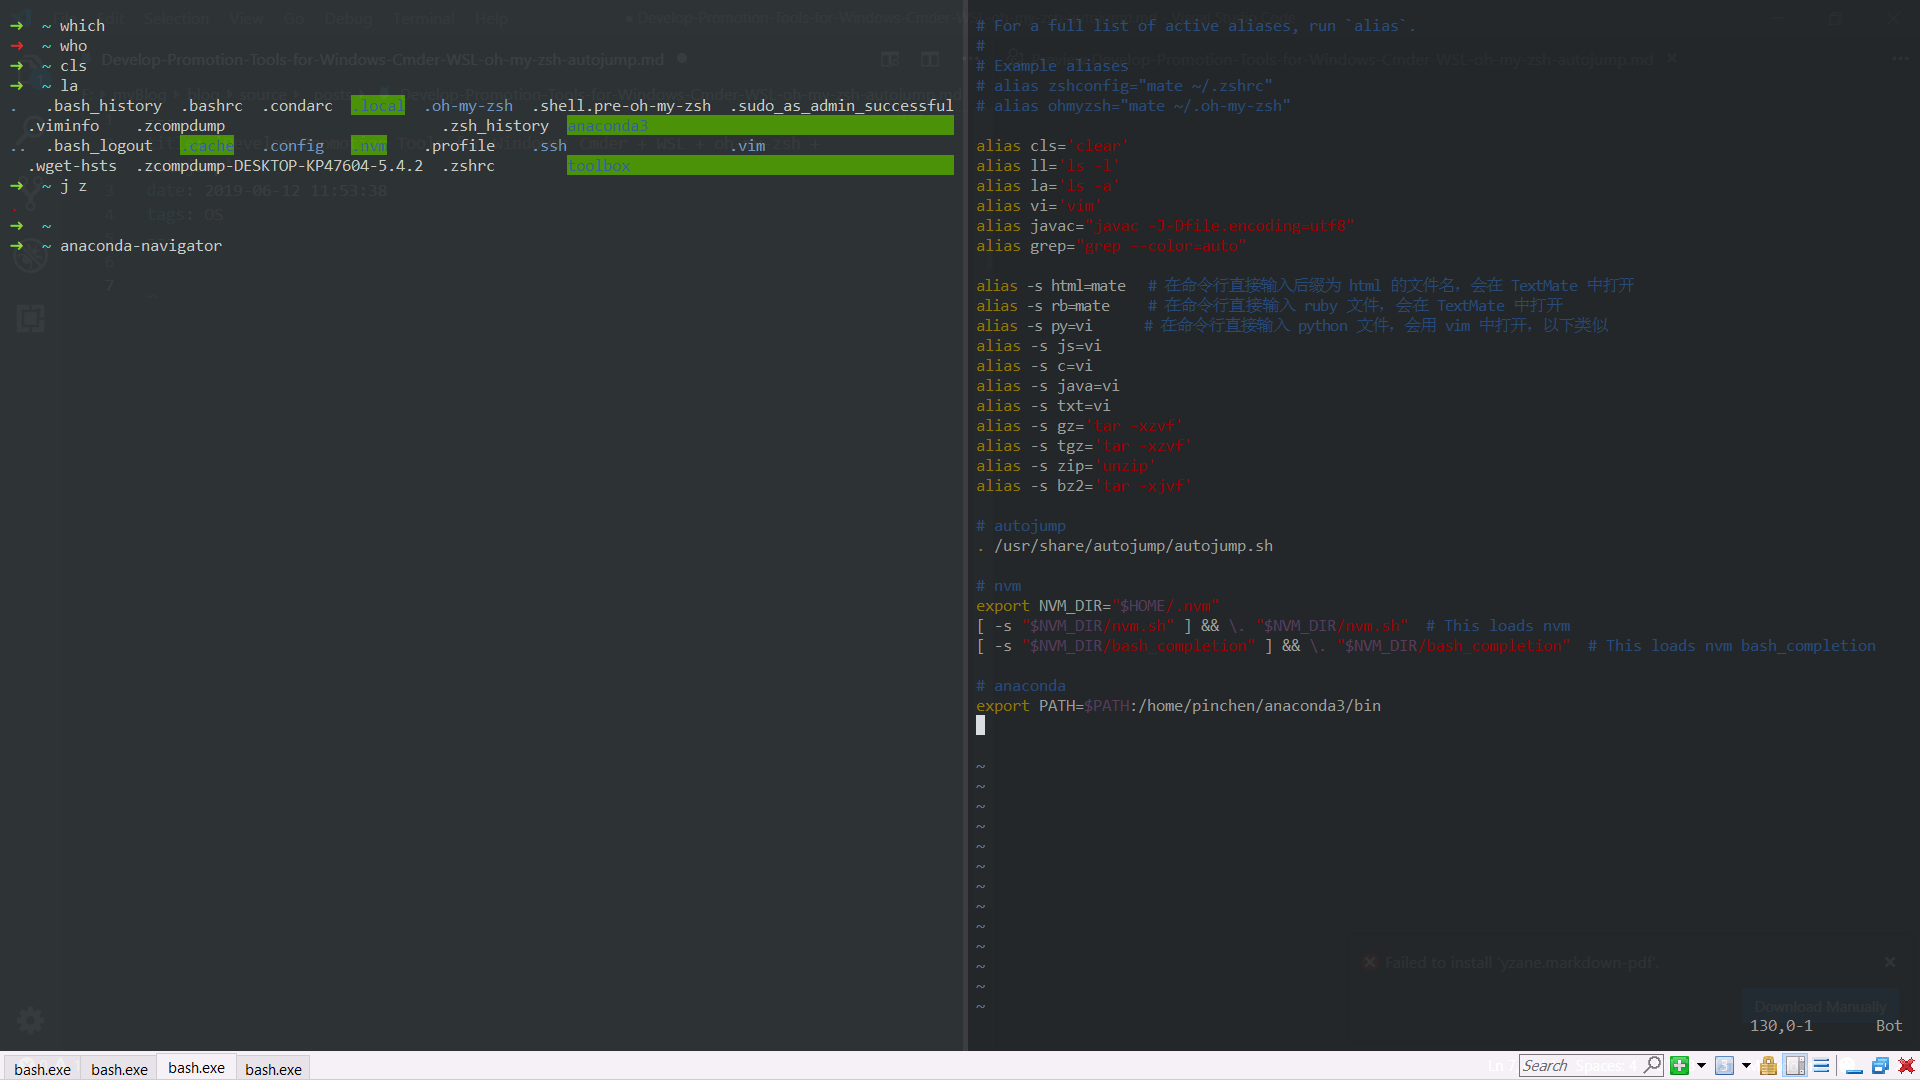
In ~/.zshrc, add:
# set alias
alias cls='clear'
alias grep="grep --color=auto"
alias javac="javac -J-Dfile.encoding=utf8"
alias ll='ls -l'
alias la='ls -a'
alias py="python"
alias vi='vim'
alias -s bz2='tar -xjvf'
the above line is to set:
input file-name.bz2 in cmd line, open the .bz2 file with tar -xjvf, that is the follow two are equal:
file-name.bz2
tar -xjvf file-name.bz2
Similar as:
alias -s c=vi
alias -s gz='tar -xzvf'
alias -s html=mate
alias -s java=vi
alias -s js=vi
alias -s py=vi
alias -s rb=mate
alias -s tgz='tar -xzvf'
alias -s txt=vi
alias -s zip='unzip'
(2) Plugin
Git:
show git:(branch) when u in a git control dir.
simplify git commands like g=git. See ~/.oh-my-zsh/plugins/git/git.plugin.zsh in detail.
Autojump:
Autojump in github.
Autojumo will record your visited dir. Use cmd j to jump in directly.
git clone git://github.com/wting/autojump.git
cd autojump
python ./install.py
check wether the following add to ~/.zshrc. The path may be different. Refer to the prompts when installing:
# autojump
. /usr/share/autojump/autojump.sh
zsh-autosuggestions
zsh-autosuggestions in github.
As you type commands, you will see a completion offered after the cursor in a muted gray color.

For installation, clone it to ~/.oh-my-zsh/custom/plugins:
cd ~/.oh-my-zsh/custom/plugins/

git clone https://github.com/zsh-users/zsh-autosuggestions ${ZSH_CUSTOM:-~/.oh-my-zsh/custom}/plugins/zsh-autosuggestions
add the following to ~/.zshrc to start a termial with zsh-autosuggestions:
# zsh-autosuggestions
source ~/.oh-my-zsh/custom/plugins/zsh-autosuggestions/zsh-autosuggestions.zsh
For usage, press the → key to accept the completion offered in a muted gray color.
4. [Optional] Install Anaconda and Node.js
4.1 Anaconda
Anaconda official site.
Anaconda is a python distribution, with installation and package management tools, like conda and jupyter.
Download its installer for Linux from the official site.
# run the Anaconda script and complete installation process
bash Anaconda3-2019.03-Linux-x86_64.sh
Add the following to ~/.zshrc if commands like conda not work:
# anaconda
export PATH=$PATH:/home/pinchen/anaconda3/bin
4.2 Node.js and nvm
Node.js is an open-source, cross-platform JavaScript run-time environment that executes JavaScript code outside of a browser.
I use nvm to install and manage Node.js in WSL Ubuntu.
nvm in github.
(1) Install nvm
curl -o- https://raw.githubusercontent.com/nvm-sh/nvm/v0.34.0/install.sh | bash
If successfully installed, the following will output nvm:
command -v nvm
If not work, add these to ~/.zshrc:
# nvm
export NVM_DIR="$HOME/.nvm"
[ -s "$NVM_DIR/nvm.sh" ] && \. "$NVM_DIR/nvm.sh"  # This loads nvm
[ -s "$NVM_DIR/bash_completion" ] && \. "$NVM_DIR/bash_completion"  # This loads nvm bash_completion
(2) Install Node.js
nvm install node # "node" is an alias for the latest version
References
- Windows10开启Ubuntu子系统简易步骤, Raysmond
- Windows10终端优化方案:Ubuntu子系统+cmder+oh-my-zsh, Raysmond
- 终极 Shell——ZSH, 池建强
